15 Kitchen Organizing Ideas That You Can Implement Today
Mar 30th 2017

The kitchen is the heart of the home and for many families, it’s the room where they eat, cook, work, spend time together and a myriad of other activities. But how can you get the most out of your kitchen, especially considering all the functions that are required of it? We’ve put together this list to give you 15 kitchen organizing ideas to do just that; without breaking a wall – or the bank.
Designers have defined the details of kitchen ergonomics to make the room optimally efficient and practical, but short of taking everything out and starting from scratch, there is not that much you can do to change the layout or basic space allocation in your existing kitchen.
By implementing these tips, your kitchen will function much better, making it a joy to spend time in.
1. Before you start to implement our kitchen organizing ideas: clear out, sort out and throw out.
Most people are so afraid that they’ll miss out on something, that they end up filling up their lives with more and more stuff. And while some things definitely have sentimental value, you shouldn’t have to hold on to something just because the person that gave it to you expects it – especially if it is sitting in some corner cupboard, broken or forgotten, taking up valuable space.
Take a close and honest look at the contents of your kitchen and decide what you can throw out, what can be repurposed and what will have a better life in someone else’s home. We live in a consumer society where every TV ad tells you what you need to make your life that little bit better. But how many times have you actually used that amazing, must-have egg-cooker or electric cheese grater? It has most likely been taking up space since you bought it.
As a rule of thumb: if you haven’t used it in the last 12 months, chances are you won’t be using it anytime soon. If you had forgotten that you had it in the first place, it’s probably a sign that you don’t need it to start with. And if you start finding duplicate or triplicate appliances, you know that you’ve been gathering stuff unnecessarily for way too long. Unless it’s a family heirloom that you absolutely must keep, give it away to charity or sell it online.
There is great liberation in clearing out a space and decluttering. And once you have created your clean slate, you can look at what is left and start to organize that with our clever kitchen storage tips so that you have the best chance at an optimally functioning and practical kitchen space.
2. Create workstations to improve ergonomics
An efficient kitchen is one where everything is exactly where you need it: everything in its place and a place for everything. Workstations are what make a commercial kitchen run efficiently and these simply consist of an area where you have everything at your fingertips in order to complete a specific task.

Source links left to right top: Country Home Decor & Home Decor Pictures
Source link left to right bottom:
Domino & Forbes
Coffee Station
Centered around the coffee machine or kettle, your coffee station should have coffee, mugs, sugar, teaspoons and tea. This is also where you store a plunger, teapot, cups, saucer, creamer and other items you may need to make hot drinks. This station should ideally be placed next to a water point.
Prep Station
This is where most food preparation will happen. Whether you are using an island, counter or table, make sure that knives and other regularly used utensils, cutting boards and a rubbish bin are within reach.
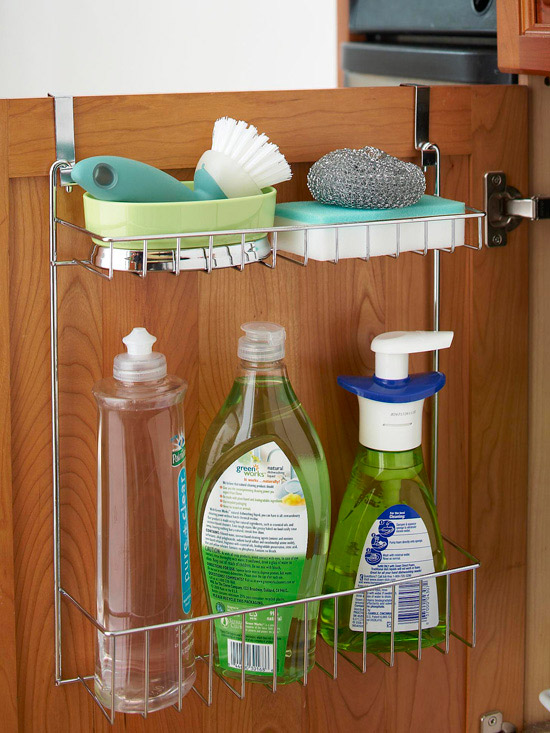
Cleaning Station
This station will naturally revolve around the kitchen sink. Everything that you need to clean and wash up, should be within easy reach of this area: cleaning products, sponges, dish cloths and specialist cleaning items can all be stored in a container under the sink.
Cooking Station
For most people, this station will be focused on the stove, but that will greatly depend on your lifestyle. If you rarely cook and prefer to heat up frozen meals, then your cooking station will most likely revolve around the microwave. Whichever appliance you use, make sure that you store all the necessary items in close proximity to it: oven mitts, cooking utensils, pot rests, and herbs and spices should all be easily accessible.
3. Leave countertops clear of clutter to create better workspaces
Nothing makes a kitchen look as messy as cluttered countertops. There is no need to display all your appliances and equipment. You can accessorize your kitchen in the same way as you would any other room in your home, but because cleanliness is key in the kitchen, it is best to stick to only the essentials.
Utensils
Keep only frequently used utensils next to the stove and pack everything else away.
You will find that there are about 4 or 5 items that get used every time you cook, and the rest of them are really only gathering dust and taking up space. Find space for them in a drawer or throw out what you don’t need.
Appliances
Unless you use your bread machine every day, don’t put it on the counter where it is taking up valuable space. The only appliances that should be on a kitchen counter, are those that are literally being used daily. When you observe your kitchen habits closely, you’ll probably find that you’re left with little more than a kettle and a toaster – if that! Find a space in your cabinets for everything or throw out what you don’t need anymore.
Accessories
Accessories are a great way to add pops of color and texture to your kitchen. If you decide to have accessories on your kitchen countertop, combine items to create a little cluster. This could be a plant, pestle and mortar and a pretty bowl with fruit, or a collection of potted herbs. Have a maximum of 3 items to avoid it becoming cluttered. Single items like a bigger plant or large fruit bowl can also work really well.
4. Keep the garbage sorted with a double garbage bin system
A double garbage bin system is a wonderful way to ensure that you don’t have a smelly and overflowing bin where you cook or eat. Keep only a small bin in the kitchen for general waste, and regularly empty its contents into a bigger bin in the scullery or outside the back door. That way you can keep your kitchen smelling fresh.
It is always wise to always sort garbage at the source, so if you are recycling, make sure that you also keep separate recycling bins for plastics, paper, metal and organic waste.
5. Use shelf and drawer sorters
Utensil and pot drawers can easily become untidy, making it difficult to find anything. Drawer organizers are an easy way to make sure that everything is accessible and visible. Standard cutlery trays come in plastic, wood or as a custom-made insert in a drawer, and they are great for keeping similar items together. They don't only work for cutlery, however; cutlery trays can also be used to sort craft or sewing supplies in the multi-purpose kitchen.
An adjustable organizer in a deep pot drawer will help pots stay stacked and lids separated so that you don’t have to rummage to find a matching pair. These inserts usually work like an adjustable pegboard so that you can custom the spacing of the compartments.

Source: Better Homes & Gardens
A drawer organizer can also be used to sort plates, bowls or any other crockery that you may want to store in deep drawers in your kitchen.
Some high-end brands also provide custom trays that are made for a specific set of kitchen utensils, where each item fits into a designated cutout shaped like the item. While it looks great, it does limit your choice of utensil and prevents you from adding other items to the drawer.
6. Keep open shelving neat and organized
Open shelves are very trendy and can be used to display collections of pretty crockery or other items. But unless these shelves are kept clean and organized, they will make your kitchen look cluttered. Here are a few guidelines to follow for successful open shelves.
- Curate the content
-
Don’t just throw things on the shelf and hope for the best. Start with the 1 item that you definitely want to have on the shelf, and then build a story around that.
- Define the thread
-
Make sure that there is a common thread that pulls your shelf contents together. Whether it's all white, all bright colors, all floral patterns or even a collection of glass or vintage items. As long as there is something connecting the pieces, they will work together.
- Get the balance right
-
Place taller things in the back and smaller things in the front. Stand back to check if the visual balance is right. And balance doesn’t have to be symmetrical – a lot of smaller items on one side can successfully balance one big item on the other.
7. The dreaded catch-all kitchen drawer
Every kitchen has that one drawer where everything that doesn’t have another place, goes.
This is another opportunity to use a drawer organizer or cutlery tray. If your drawer is filled with larger items that won't fit in a cutlery tray, however, small plastic baskets or containers will help to create compartments for all the items.
The catch-all drawer also present a great opportunity to utilize some discarded cardboard: anything from empty toilet rolls to cereal boxes can be used to compartmentalize this drawer. Cut down the boxes to the desired height and place them in the drawer to create boxes. Then sort items and store similar ones together.
Hanging a shoe organizer behind the kitchen door or on the inside of a tall cabinet door will also give you plenty of additional space to store bulkier items like carrier bags, gardening tools, and scissors.
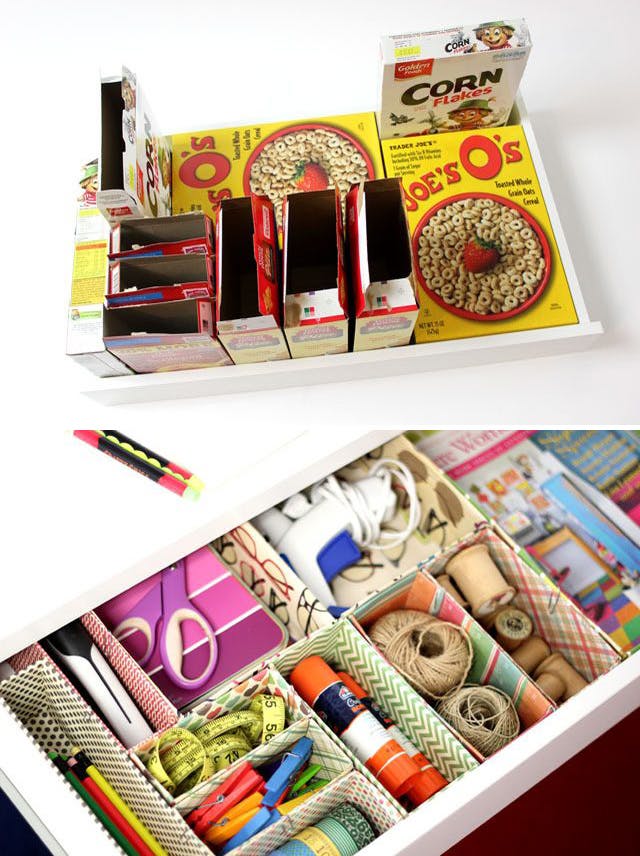
Source: Apartment Therapy
8. Place items that are used every day within easy reach
Ergonomics states that to be most efficient, you should use the least amount of movements to complete a task. In a kitchen where we complete many daily tasks, it is, therefore, essential to store items in the most efficient place.
Ensure that all your most frequently used items are stored at eye level. You shouldn’t need to reach or bend to get things like a cutting board, plates or cutlery. Items that are not being used every day, can be stored on the top shelves of upper cabinets and on the lowest shelf of floor units.
A word of caution: always store heavy items like cast iron pots and bulky appliances on the upper shelf of lower cabinets. Ensure that you bend your legs and not your back when you take these out. Excessive bending to pick up heavy items may result in injury.
9. Make your corner cupboard work for you
Corner cupboards are notorious for being one of the more impractical areas in a kitchen. Thankfully, there are a few easy ways to get around that.
To get the most out of the space, install a lazy susan inside. This will ensure that you can reach all the items inside without having to rummage around in the back. You also get baskets that can be pulled out to further simplify finding items.
A corner cupboard can also successfully be converted to a drawer unit. While you end up losing around a quarter of the interior space, it is the most user-friendly option when it comes to accessibility.
If a corner cupboard revamp is not on the cards, then utilize your corner cupboard to store appliances that are used infrequently. Large blenders and mixers can be stored with ease in a wide corner, together with other items like serving platters and bowls that are used occasionally.
10. How to utilize your cabinet doors
Cabinet doors offer such a great opportunity for creating additional space, especially in small kitchen organizing. When you think about it, there is still a lot of space between the door and items that you have inside a cupboard. So maximize that space by adding shallow shelving.
These little shelves can hold anything from condiments and spices to tin foil and sandwich bags.
You can also use shallow hand towel rails on the inside of cabinet doors to hold pot lids, freeing up shelf space and making finding a matching lid easier.
Use a shower caddy installed on the inside of a pantry door to hold sandwich spreads and sauces.
Pegboards can also be installed on the inside of cabinets to hold cooking utensils or baking accessories. And a magazine rack installed on the back of a door is the perfect place to store baking sheets or plastic wrap.
Source: Better Homes & Gardens
11. Clever storage of brooms and mops
Cleaning equipment is absolutely necessary for the kitchen, but they can be awkward to store.
A broom cupboard is a convenient space for tall items like an ironing board, broom and mop, but it is not the most efficient use of space. Rather install brackets on the inside of the broom closet door to hang these items on, and then install shallow shelving in your broom cupboard to house cleaning products.
If you don’t have the luxury of a scullery or broom closet to store these bulky items, you could try to create a small space next to the fridge to keep them out of the way. Install an inexpensive slide-out broom and mop holder in that small gap, and you’ve maximized storage while keeping unsightly household cleaning items out of the way.
TOP TIP: mops tend to become grimy and foul-smelling. Soak your mop for 30 minutes after every use in a bucket of water with 1 cup of white spirit vinegar added. Then let it dry in the sun before storing. The vinegar and sunlight will eliminate bad odors and bacteria.
12. Make your laundry space work for you
The laundry is a hard-working area, and when you don’t have a dedicated laundry room, you should make sure that your laundry area is especially well organized. This is another workstation that should be able to function on its own, so you will need to ensure that you have everything you need in that same space. And it doesn't have to take up a lot of room either!
For a smaller kitchen that has to function as a laundry as well, a front loader is a much better option than a top loader. While a top-loader can accommodate a bigger load, you will lose a lot of functional space above the machine.
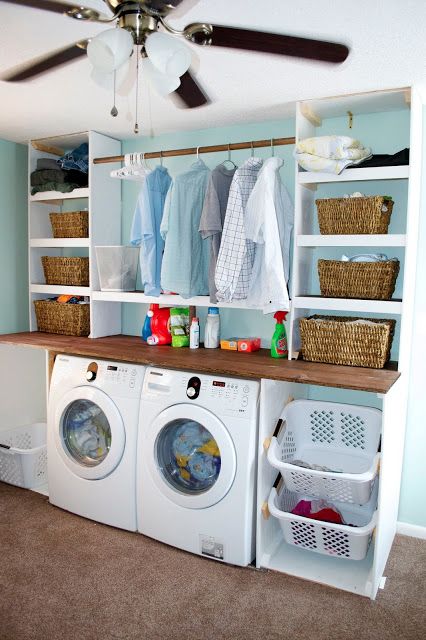
Source: DIYs Hacks
Add shelving above the machine to hold laundry baskets and washing products, and brackets to hang the ironing board so that it doesn’t take up floor space when not in use. A bracket to hold the iron is another convenient addition to the inside of a cabinet door, keeping the iron out of the way even when it is still cooling down after use.
13. Create a dreamy, practical pantry cupboard
Especially when you have a bigger family, it can be a nightmare keeping your pantry organized. To make things easier, treat the pantry like retailers treat a supermarket and sort products according to type: dried goods like pasta, rice and legumes; cans; cereals; baking products; sauces and condiments; pickles and preserves; cookies and biscuits; sweets.
To store them on the shelves, you will need to first determine your needs:
- Which items do you have more of that will require more space?
- Are you trying to keep sweets and biscuits away from the kids or would you like them to be able to access them?
- Which items do you use frequently and which ones can be stored higher up?
Place things that you use most on shelves that are eye-level, with items that are used less frequently on the lower and higher shelves. Ensure that everyday items are within easy reach of all members of the family unless of course, you'd prefer them not to get hold of it.

Source: HGTV
Invest in shelf inserts and can-dispensers to make seeing products easier and to maximize the available space. And if you regularly have condiments on the table, store them in a plastic or metal caddy that can be placed on the table without having to take things out one by one.
14. Storage ideas for your freezer
Freezers are great to store bulk-buy food, leftovers and ready meals. But unless you have a system in place, it is quite easy to forget what you have in there and what their use-by dates are.
Always freeze items in clear plastic containers or bags so that you are able to see its contents, and make sure that everything is labeled clearly with the item and the date on which it was frozen. Sort shelves in the freezer by items, the same as you would in your pantry cupboard: meat; poultry; ready meals; kid’s meals; packets of fruit and veg etc.
If you have an upright freezer, place plastic baskets on every shelf that will allow you to easily take an entire shelf’s contents out to find what you’re looking for.
A chest freezer is a bit trickier to organize, but if it’s not done properly, it could cost you a lot of money in unnecessary purchases and food gone to waste.
Use stackable storage baskets to organize food according to their category, and use a whiteboard or chart to make a map of the contents of your freezer. That way you will know exactly what is going on 3 levels down.
15. Get the most out of your fridge
Similar to a pantry cupboard and freezer, you should organize your fridge by category. Place frequently used items at eye level, with items used less on lower and higher shelves.
Plastic baskets are very useful to keep items organized: different types of cheese; cold meats; condiments; sweets and desserts. Drinks and yogurts are also much easier to organize and find when they are placed in baskets that can be removed.
Most fridges have drawers in the bottom for crisping. Make the most of these dedicated spaces by storing fruit in one, and veggies and salad in the other.
Storing food in clear glass or plastic containers will further ensure that nothing is forgotten in a dark corner, only to be rediscovered when it’s too late.
A dedicated shelf for the kids with healthy snacks and treats will not only reinforce good eating habits, it will also prevent them from leaving the fridge in a mess when looking for something to eat.
By implementing even only a few of these clever kitchen organizing ideas, you will be able to maximize storage and efficiency in your kitchen, whatever its size and layout shortcomings.
Please share with anyone who would enjoy these tips!